How to add WIFI functionality to AM62x?
The AM62x series from Texas Instruments (TI) is a powerful platform for industrial applications, embedded systems, and IoT devices. Adding a Wi-Fi module to the AM62x can enhance its connectivity, enabling applications to communicate wirelessly. This article will outline the steps to integrate a Wi-Fi module with the AM62x, including hardware connection, software configuration, and testing.
1. Select a Wi-Fi module
1.1 Before starting the integration process, select a compatible Wi-Fi module. Some common options include:
● AP6212 from Zhengji
● ESP32
● TI's WL1837MOD
Make sure the module you choose supports the required features and protocols (such as 802.11b/g/n) in your application. In this article, we use AP6212 for connection testing.
1.2 AP6212 module introduction
AP6212 is a low-power, high-performance WiFi+BT4.2 module launched by AMPAK. The module complies with the 802.11b/g/n standards. The WiFi function uses the SDIO interface, and the Bluetooth uses the UART/I2S/PCM interface. It has StationMode, SoftAP, P2P functions, etc. The wireless module complies with the IEEE 802.11 b/g/n standards and can achieve a maximum speed of 72.2Mbps in single-antenna transmission of the 802.11n specification, 54Mbps in accordance with IEEE 802.11g, or 11Mbps in accordance with IEEE 802.11b to connect to a wireless LAN.
2. Hardware connection
2.1 Power connection
According to the specifications of the selected Wi-Fi module, ensure that it is provided with appropriate power. Usually the WIFI module requires a 3.3V power supply, and the selection of VDDIO needs to be selected according to the SDIO level of AM62x. If 1.8V is selected, level conversion is required, and if 3.3V is not required.
2.2 Data connection
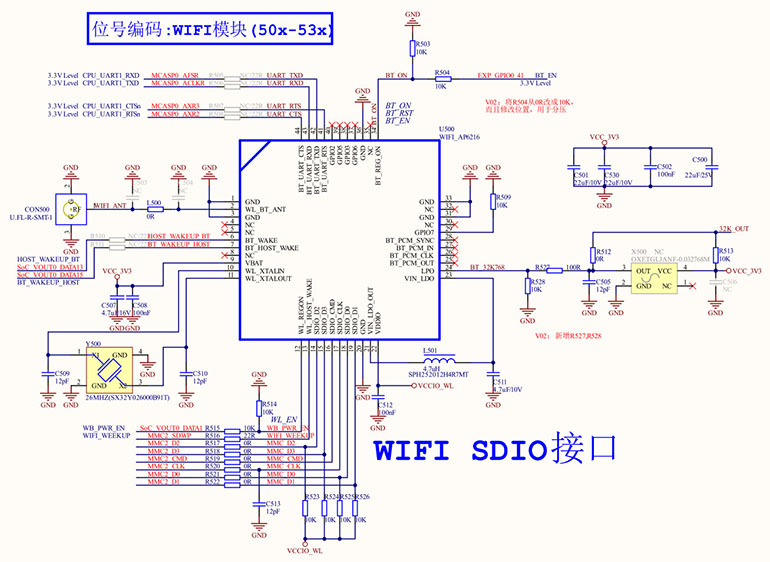
The Wi-Fi module is usually connected to the main control chip through the MMC and UART interfaces. The following is an example of the connection between MMC and UART:
●MMC connection: Connect the SDIO interface of the Wi-Fi module to the corresponding MMC pin of AM62x. Common pins include:
MMC_D0~MMC_D3: SDIO data line
MMC_CMD: SDIO command signal line
MMC_CLK: SDIO clock signal line, the rate can reach 50Mpbs
WB_PWR_EN: WiFi module power enable
WIFI_WEEKUP: WiFi module wake-up
●UART connection: Connect the UART interface of the Wi-Fi module to the corresponding UART pin of AM62x. Common pins include:
UART1_RXD: Bluetooth serial port receiving pin
UART1_TXD: Bluetooth serial port transmitting pin
UART1_CTSn: Bluetooth serial port flow control pin
UART1_RTSn: Bluetooth serial port flow control pin
BT_WAKEUP_HOST: Bluetooth wake-up host
HOST_WAKEUP_BT: Host wake-up Bluetooth
BT_EN: Bluetooth function enable

Figure 1 AM62x and AP6212 connection diagram
3. Software configuration
3.1 Driver installation
Depending on the Wi-Fi module used, you may need to install the corresponding driver. You can contact the Zhengji agent to obtain the driver.
3.2 Configure the network
In Linux system, you can use wpa_supplicant and tools to configure the Wi-Fi network.
Modify the /etc/wpa_supplicant/wpa_supplicant-wlan0.conf file to support static configuration
ip parameters
Add wifi AP configuration:
network={
ssid="home"
psk="PASSWORD"
}
Or use the wpa_passphrase command to configure:
wpa_passphrase ssid_name ssid_password >> /etc/wpa_supplicant/wpa_supplicant-
wlan0.conf
Then you can start the wifi service:
systemctl start wpa_supplicant@wlan0
If you want to start by default at boot:
systemctl enable wpa_supplicant@wlan0
4. Test the connection
4.1 Verify Wi-Fi connection
Use the following command to check the Wi-Fi connection status:
Use ifconfig to check whether the wlan0 device has an IP address
41 Test the network
Use the ping command to test the network connection:
ping www.weathink.cn
If you can receive a response, it means that the Wi-Fi module has been successfully connected.
Conclusion
By following the above steps, you can easily add a Wi-Fi module to Weathink WTC-AM62x SOM and enhance the wireless connectivity of the device. Depending on the specific application requirements, you may need to make further optimizations and adjustments. I hope this article can help you successfully complete the integration of the Wi-Fi module!


